
TABLE OF CONTENTS
- 01 — Meet the Two Ferrari Helmets
- 02 — Why These Sets Are Made for LED Lighting
- 03 — Full Kit Contents: Lighting for Lewis Hamilton 43022 vs Lighting for Charles Leclerc 43014
- 04 — Auto Light Control Feature Explained
- 05 — Color Design Logic: Warm Gold vs Ice Blue
- 06 — Step-by-Step Installation Guide
- 07 — Power Supply Options
- 08 — FAQ
01 · Meet the Two Ferrari Helmets
In 2026, LEGO launched two flagship collectibles alongside Scuderia Ferrari HP: the LEGO Lewis Hamilton Helmet 43022 and the LEGO Charles Leclerc Helmet 43014. Built at near 1:1 scale and packed with official sponsor details — UniCredit, Shell V-Power, VistaJet, Richard Mille — both sets include a dedicated minifigure and a signed nameplate stand. BrickBling developed dedicated light kits for each, with every LED color and placement engineered to match the helmet's real-world palette.


02 · Why These Sets Are Made for LED Lighting
LEGO helmet sets are among the most lighting-friendly builds LEGO has ever produced. The large translucent visor, hollow interior cavity, and raised pyramid stand create a near-perfect environment for internal LED illumination. Here's why a BrickBling kit transforms the 43022 and 43014 into something genuinely spectacular:
🔆COB visor glow
The 6-segment COB strip wraps the interior dome, creating an even diffused glow that spills through the transparent visor exactly like a real lit helmet.
🌐Full shell radiance
Interior LEDs bounce off the hollow cavity wall, giving the entire outer shell an ambient luminosity — especially visible on the gold surface of the LEGO #43022.
🏆Sponsor decal depth
Backlighting causes printed stickers — Richard Mille, VistaJet, V-Power — to appear saturated and three-dimensional rather than flat on a shelf.
🔌Clean cable routing
The pyramid stand's stud gaps accommodate BrickBling's light cables with zero visible wire — the build looks stock from every angle.
🎨Color-matched by design
Warm white for Hamilton, ice blue for Leclerc — every LED color was chosen to complement the helmet's actual paint scheme and visor tint.
✨Auto light-sensing
Both LEGO Light kits include a light-control module: The Light-Control Version Light Kit for LEGO Scuderia Ferrari Lewis Hamilton Helmet and LEGO Scuderia Ferrari HP Charles Leclerc Helmet added a photosensitive sensor that allows you to control the lights through hand gestures or changes in light.


03 · Full Kit Contents: Lighting for Lewis Hamilton 43022 vs Lighting for Charles Leclerc 43014
Each BrickBling helmet light kit ships with components organized into three labeled bags plus a power supply. The following is a detailed showcase of each lighting component in these two sets of equipment.


Both kits share the same structural layout: a COB strip as the primary interior light source, two standard point LEDs for accent detail, a rigid strip for the visor frame area, and an auto light-control module. The key differences are the COB strip color (warm white vs ice blue), the accent LED color (warm white vs red), and the 1×1 diffuser plate color (white transparent vs red transparent) — each chosen to reinforce the helmet's individual identity.
Lewis Hamilton 43022 → Shop Now Light Kit for LEGO
Charles Leclerc 43014 →
04 · Auto Light Control Feature Explained
Both kits include the light-control module (SKU: A041) — a small sensor that monitors the ambient brightness of the room. The module is mounted using the included double-sided adhesive tape, positioned inside the base stand with a clear line-of-sight to the room but hidden from direct view. The light-control function is entirely invisible to anyone looking at the finished display.

When the surrounding light dims, the module detects the change and automatically illuminates the LEDs on the helmet; when the ambient light returns, the LEDs automatically turn off. On one hand, we can control the brightness of the lights through hand gestures, and on the other hand, we can adjust them using the foldable plaque beneath the helmet. In fact, both methods work by altering the intensity of the light around the light-control module to control the switch. Overall, it’s a very fun and interactive experience. No app, no remote, no manual switch required.
The module is mounted using the included double-sided adhesive tape, positioned inside the base stand with a clear line-of-sight to the room but hidden from direct view. The light-control function is entirely invisible to anyone looking at the finished display.

05 · Color Design Logic: Warm Gold vs Ice Blue
The most important decision BrickBling made in designing these kits was color. Each helmet's LED palette was engineered to work with the brickwork's existing hues, not against them.
LEGO Lewis Hamilton Helmet 43022 · Warm White Light Kit
COB Warm White + Warm White LEDs + White Diffuser Plates
Warm white light amplifies the yellow-gold brick surface, making the shell appear to radiate from within. The two warm white point LEDs, diffused through white transparent 1×1 plates, add soft highlight accents without harsh hot spots. The deep red visor gains warm luminosity depth under this lighting.

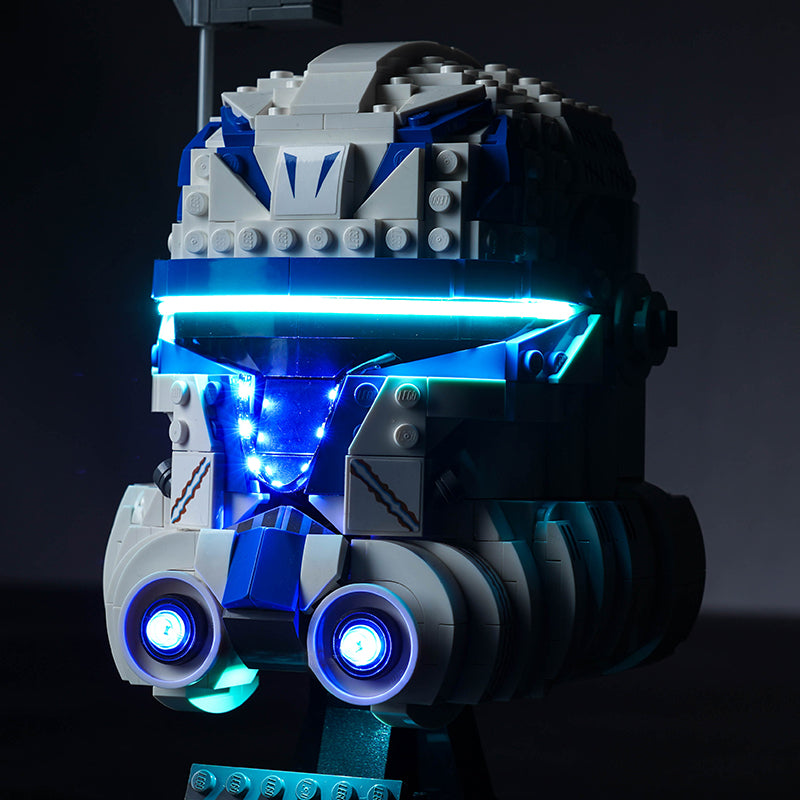
LEGO Charles Leclerc Helmet 43014 · Ice Blue Light Kit
COB Ice Blue + Red LEDs + Red Diffuser Plates
Ice blue COB lighting creates the crisp, high-tech look of a carbon-fiber helmet under race lighting — complementing the white panels and blue transparent visor. The two red point LEDs, diffused through red transparent 1×1 plates, echo the Ferrari red bodywork and create a warm-cool tension that mirrors the real helmet's visual identity.

Notably, both the LEGO Lewis Hamilton Helmet 43022 Light Kit and LEGO Charles Leclerc Helmet 43014 Light Kit include the same warm white rigid strip. This strip is positioned at the visor frame edge — where the warm tone reads as natural reflected light regardless of the helmet's primary color scheme, ensuring the nameplate area and lower chin section are always evenly lit without any color cast.
06 — Step-by-Step Installation Guide
BrickBling provides detailed online step-by-step installation tutorials for both LEGO helmet lighting kits, including PDF and video versions, with installation taking approximately half an hour.
Below are the installation videos for the two lighting kits:
07 · Power Supply Options
Both kits include the combo power supply — a dual-mode solution that covers permanent installations and portable or travel use.
🔌 USB Mode · 50cm USB Cable
Plug into any standard 5V USB adapter, laptop port, USB hub, or power bank. Ideal for a permanent shelf display where the cable can be managed discreetly behind furniture. Consistent, stable power with no battery changes required.
Best for: permanent displays
🔋 Battery Mode · AAA Battery Box
The included AAA battery box slots into the base stand and powers the kit completely wirey. Standard AAA cells provide several hours of illuminated display per charge.
Best for: gift/photography / exhibitions